Changing your oil and different oil types
 Automotive Knowledge Automotive Knowledge
This guide is intended to provide you with a basic understanding of basic method of changing your oil; not to provide in-depth knowledge of engines. It will assume that you are at least familiar with the basic components of an engine such as the oil filter, filler cap, oil pan and drain plug, et cetera. On most vehicles, ramps or jack stands will be necessary. Use extreme caution to ensure your car or truck is properly supported at all times.
Oil Changes
You left work early to beat rush-hour traffic and only a few minutes separate you, your family, and departure for a long overdue trip to the lake. Just as you start to head down the off-ramp, you notice a light on the dash. Change Oil Soon! Your wife warned you a week ago to bring the car in for service and now she's going to kill you! Besides that, neglecting your oil change schedule will cause your engine's internal components to wear out prematurely. It didn't have to be this way! Oil changes are simple and require only a few common hand-tools. They are also, without-a-doubt, the most valuable investment you can make in the life of your engine. Follow along and we'll cover the basic steps to changing your own oil.
Lifting The Car
Park your car or truck on a level, paved surface and position a set of quality car ramps in-line with the front wheels. Drive slowly up the car ramps until both tires are resting in the grooves at the top of each ramp. Be sure to set the parking brake before taking your foot off the brake pedal. If you are using jack stands; lift one side of the car or truck at a time, as you would to change a tire. Be sure to position the jack and jack stands in an appropriate lifting spot (consult your owners manual for specific locations). Be sure to let the engine cool down before performing any type of work on the engine.
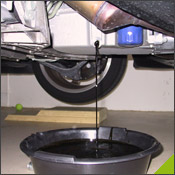
Draining Old Motor Oil
After the engine has cooled down, remove the oil cap from the top of the engine. Position a drain pan under the oil drain plug on the bottom of the oil pan. Loosen the plug with the correct size wrench or six-point socket and ratchet. As the old saying goes: "Lefty-Loosey, Righty Tighty". If the drain plug is rounded, rusty, or the threads are damaged, you will need to replace it. They should be readily available at your local auto parts store or dealership. Use your fingers to remove the drain plug and be careful not to drop it into the drain pan! Allow the oil to drain completely before reinstalling the drain plug. Check the gasket on the oil drain plug and replace it if necessary. When the oil has drained completely, reinstall the drain plug and tighten until snug. Take care not to over-tighten the drain plug or damage the threads in the oil pan. Some vehicles (most notably late-model Ford V8 engines) have two drain plugs; one at the front of the oil pan and one at the rear, behind the lower cross member.
Changing Oil Filters
Twist off the old oil filter and empty its remaining contents into the drain pan. Put the old oil filter into an old grocery bag and tie the handles. Check to be sure the old filter's rubber gasket came off with the filter. If not, it should be easy to peal off from the oil filter adapter. Use your finger to brush a little fresh oil on the new oil filter's gasket before threading it on. If the oil filter is mounted vertically, fill the new filter with fresh oil before installing. This will help build oil pressure faster when you restart the vehicle! If it isn't mounted vertically, just install the new filter empty (or risk making a huge mess!). An oil filter's rubber gasket does a great job of sealing, so the filter need only be installed hand-tight. On some vehicles the oil filter sits inside the oil pan or a special housing. Find the oil filter plug and remove it with the appropriate socket or wrench. Replace the oil filter element and reinstall the same way the old one came out.
Choosing Motor Oil
There are no shortage of choice when it comes to oil these days. You can choose between various grades (such as conventional or synthetic oils), various weights (such as 5W30 and 10W30), and various brands (such as Mobil, Castrol, Pennzoil, Valvoline, and Quaker State) of motor oil. There are a few things to consider before choosing a grade, weight, and brand of oil. If in doubt as to which oil you should use for your vehicle, consult your owners' manual or the dealership for suggestions. Keep in mind that most major oil manufacturer's will formulate their oil to meet the industry's minimum quality specifications.
Adding Motor Oil
With the drain plug in, and the new oil filter installed, pour the required amount of fresh oil into the engine. There are a few things to take into consideration in determining how much oil to add to the engine. Start by finding the oil capacity indicated in your car or truck's owners manual. Subtract the amount of oil you used if you filled the new oil filter before installing. It is also wise to subtract a small amount during the initial fill to avoid over-filling the engine. When you are sure the drain plug and oil filter are tight, use a funnel and pour the required amount of fresh motor oil into the engine (through the oil filler hole). Allow a minute or so, for the fresh oil to fall to the bottom of the oil pan (and the oil pump pickup), then start the engine. Let the engine run for a minute to allow the fresh oil to circulate. A quick check under the car or truck will remind you if you have forgotten to tighten something (and allow you to shut off the engine before any damage is done). Lower the vehicle off the car ramps or jack stands and use the dipstick to check the oil level. Top-up as required.
Finishing up
Some vehicles equipped with a "Change Oil Soon" warning light will need to be reset. Your car or truck owner's manual will give detailed instructions on how to do this. Since your oil should be changed every three months or more, they provide an excellent opportunity to check and adjust your tire pressures, add fuel injector cleaner, and check other engine components for wear and tear. All-Three-Every-Three (A3E3), is a suggested practice from the Crew Chiefs at Petty Enterprises, Ltd. It's basic concept is to change your oil (1), clean your fuel injectors (2), and check your belts, hoses, fluids (3), every 3,000 miles. When you consider the price of a new fuel injector, diagnostic labour, and other engine components there really is no better alternative then preventative maintenance.
Recycling used oil
Pour the old oil into a empty plastic container and mark "used oil" clearly on the container with a permanent black marker. Be sure to take the used motor oil and oil filter to the proper recycling facility for disposal. Used motor oil is very harmful to the environment and easily pollutes water sources.
|
