Changing your shock absorbers
 Basic Suspension Knowledge Basic Suspension Knowledge
This guide is intended to provide you with a basic understanding of how to replace shock absorbers; not to provide in-depth knowledge of steering and suspension systems. It will assume that you are familiar with the basic components of your vehicle's suspension such as the shocks themselves, struts, springs, et cetera. It is often helpful--and sometimes necessary--to lift the vehicle and remove the wheels in order to gain access to the shock absorbers. Use extreme caution to ensure your car or truck is properly supported at all times.
Shock Absorber Problems
The function of a shock absorber is commonly misunderstood. Shock absorbers are designed to absorb and control the vertical movement of your vehicle's springs. Shocks do not control the height of the vehicle; this is the function of the springs. Worn out, damaged, or leaking shock absorbers allow the wheels to bounce, which results in poor tire-to-road contact, vibrations, premature tire wear, reduced braking performance, and increased noise. Unfortunately, shock absorbers are often neglected until they fail completely. Be sure to have the shocks checked each time your vehicle's brakes are checked (approximately every 12,000 miles). Fortunately, replacing shocks is a relatively easy task and can be completed in less than an afternoon.
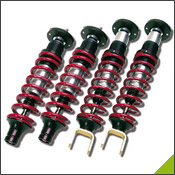
A Note About Coil Springs
If your vehicle is equipped with coil springs, there are some additional safety precautions you must take before removing your shock absorbers. It is important to ensure that the coil springs cannot come free when you remove the shocks. On some vehicles--generally newer cars--the solid rear axle is held tight by the shock absorber itself. When the shock is removed, the suspension can drop far enough to permit the coil spring to come loose. In these cases, it's important to use a spring compression tool to prevent the coil spring from springing out freely.
Step 1: Setting Up The Vehicle
The first step is to determine whether you will need to raise the vehicle in order to access the shock absorbers. Simply check to see whether you can get access to the upper and lower mounting bolts while the vehicle is on the ground. The lower mounts will be located near the wheel at the bottom of the axle and the upper mounts will be located near the frame (trucks and older cars) or in the trunk under the carpet (newer cars). If you do need to raise the vehicle, try to place the jack stands under the suspension at each wheel instead of the frame. This keeps the suspension loaded and can help prevent the springs from coming out when the shocks are removed.
Step 2: Removing Old Shocks
Every mechanic learns early in their careers that the first step to removing shocks is to thoroughly lubricate the top and bottom mounting bolts with a penetrating old. Let the bolts and nuts soak for at least five minutes before trying to remove them. Do not be too concerned if the bolts break since new bolts will be provided with the new shocks. Remove the upper mounting bolts first, then the lower, then remove the shock itself.
Step 3: Installing New Shocks
Installation is simply the reverse of the removal procedure. Start by verifying the new shocks match the old shocks and that new bushings, washers, bolts, and nuts, have been provided. Install the shock into the lower mount first and install and tighten the new mounting hardware. Compress the shock and then guide the top mount into place as the shock expands. Install the new mounting hardware and tighten. Repeat for the second shock and lower and road test the vehicle.
|
